How to apply blush
Apply blush in thin layers after foundation: cream, liquid and stick usually go before setting powder; powder blush goes after. Start with a light tap on the cheeks, blend the edges outward or upward for your chosen effect, then check in daylight. Build slowly, and soften excess with your base sponge.
What you need
Choose one blush formula and one tool. A fluffy brush diffuses powder; clean fingers or a soft synthetic brush tap on cream, liquid or stick. You do not need all four formulas. The makeup brushes guide explains the tools if you are starting from scratch.
Let moisturizer and sunscreen settle before makeup. If you wear foundation, apply a thin layer first. Keep a clean sponge or the sponge you used for your base nearby to soften mistakes.
Choose a formula and put it in the right order
| Formula | When to apply | Tool | Start with | How to build |
|---|---|---|---|---|
| Powder | After foundation and a light layer of setting powder, once the base is no longer tacky. | A soft, fluffy blush brush. | One light tap into the pan; tap off excess. | Blend the first layer, then pick up a little more only where you want stronger color. |
| Cream | After foundation, before setting powder on the cheeks. | Clean fingertips or a soft synthetic brush. | A light fingertip tap into the product, shared between the cheeks. | Press on a sheer layer, then tap on another. Avoid rubbing the base underneath. |
| Liquid | After foundation, before setting powder; work one cheek at a time. | Clean fingertips, a synthetic brush or a damp sponge. | A tiny dot on the back of your hand; pick up only part of it. | Blend promptly, let the layer settle, then add a small dab. Pigment strength varies. |
| Stick | Usually after foundation and before setting powder; follow the formula instructions. | Fingers or a synthetic brush lifted from the stick. | One light swipe onto the back of your hand, then a small tap from there. | Warm it on your hand and press on thin layers. Dragging the stick across your face can lift foundation. |
For dry or textured cheeks, try cream or liquid in thin layers and keep powder light. For oily cheeks, try powder blush or set a cream with a little matching powder blush. Treat combination skin by area; see how to make makeup last for prep and touch-ups.
How to apply blush step by step
- Find your placement. Smile gently to locate the apples, then relax your face and feel along the cheekbone. Choose an effect from the table below before placing color; check the position with your face relaxed.
- Load lightly. Tap a powder brush into blush and tap off excess. For cream, liquid or stick, spread a little on the back of your hand and pick up a small amount.
- Place the color. Tap it where you want the flush to be strongest. Keep the first patch small so you have room to blend; use gentle pressure over foundation.
- Blend the edges. Use short, light strokes for powder and tapping motions for wet formulas. Work outward for a natural flush or upward along the cheekbone for lift, softening the edge with a clean part of your tool.
- Build gradually. Check both cheeks before adding more. Add another thin layer only where color is missing; let a liquid layer settle before deciding it needs more.
- Check in daylight. Look straight ahead near a window, then turn your head. Soften any stripe or uneven edge with your base sponge or a clean brush.
- Set if needed. Leave dry cheeks with minimal powder. For longer wear on oily cheeks, lightly press matching powder blush over cream. Avoid heavy powder layers, which can dull the color.
Choose your placement by effect
| Effect | Where | Blend direction | Keep in mind |
|---|---|---|---|
| Natural flush | On the apples and slightly along the cheekbones. | Softly outward, fading the edges into the base. | Use a sheer layer and check with your face relaxed. |
| Lifted | On the upper, outer cheekbone. | Up and back toward the temple. | Keep the lower edge soft. See the mature skin guide for texture and placement tips. |
| Soft and round | On the center of the apples. | In small, rounded motions, diffusing around the center. | Keep the patch small at first; soften its outline so it is not a solid circle. |
| Draped | Along the outer cheekbone and onto the temple. | Upward in a soft curve, joining cheek and temple. | Build gradually. The 1970s makeup guide shows how draping fits a whole look. |
| Sun-kissed | Across the upper cheeks, with a trace over the bridge of the nose if you like. | Lightly across, keeping the nose much softer than the cheeks. | Use what is left on the tool for the nose. This is a makeup effect, not a reason to skip sunscreen. |
For placement tailored to your proportions, see the face shape guide.
How to fix blush mistakes
| Problem | Likely cause | What to do |
|---|---|---|
| Too much blush | Too much pigment picked up at once or several layers added too quickly. | Press over it with your base sponge and its leftover foundation. For powder, first diffuse with a clean fluffy brush. Add no more blush until you check in daylight. |
| Harsh stripe or edge | A dense tool, heavy pressure or too little blending around the first patch. | Use a clean brush or sponge to soften just the boundary. Tap or make short strokes out from the edge; do not drag the color farther down the cheek. |
| Patchy on texture | Dry patches, powder catching on a tacky base, or rubbing wet blush over a powdered cheek. | Stop layering. Press gently with a damp sponge; if the base has lifted, remove and redo only that patch. Next time let prep settle and tap on thin cream or liquid layers before powder. |
| Muddy or grey | Blush mixed into contour or bronzer, a dirty brush, or a shade that is too pale or muted for your skin. | Switch to a clean tool. Lift or cover the muddy patch with a little base before adding a sheer blush layer; keep its strongest color separate from contour. Recheck the shade in daylight. |
| Fades by midday | Oil, rubbing your face, or a thick base that moves underneath the blush. | Blot shine first, then tap on a little color. Next time use thinner base layers and, if your cheeks need it, set cream with a light layer of matching powder blush. |
Choosing a shade
Start with a shade that shows as a soft flush against your skin, then adjust its depth and warmth in daylight. If it looks grey, test a less pale or less muted shade before adding more. Use the undertone test to compare undertone clues and the skin tone guide for shade families by depth.
How this connects to Lookslate
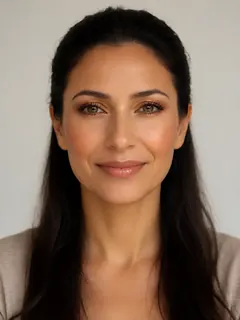
The Lookslate preview prompts ask for different cheek details within whole looks: Soft Glam asks for "rosy blush on the cheekbones", Smokey Eyes for "soft blush", Eyeliner Focused for "softly flushed cheeks", Business for "rose blush", and Bronze Goddess for "peach blush". Evening Glam asks for "sculpted cheeks with a radiant highlight"; its prompt does not specify blush.
These previews show whole looks. They do not analyse face shape or isolate blush, and they are not guaranteed to render each prompt detail identically. Use them to compare an overall style, then use the steps above to apply your blush.
Try a look on a sample face for free with no sign-in. Sign in to use your own photo. When personal-photo previews are available, each email gets 1 free look on its own photo; paid own-photo looks are currently unavailable, so additional looks cannot be purchased.
Frequently asked questions
Does blush go before or after powder?
Cream, liquid and most stick blushes go after foundation but before setting powder on the cheeks. Powder blush goes after a light layer of setting powder, once the base is no longer tacky. Follow your formula instructions if they differ.
How do I fix too much blush?
Press over it with the sponge you used for foundation, using the small amount of base left on it. For powder blush, try a clean fluffy brush first. Work gently and check in daylight before adding anything else.
Why does my blush look patchy or muddy?
Patchiness can come from dry texture, a tacky base or rubbing cream over powder. Muddy color can come from mixing blush into contour, a dirty tool or an unsuitable shade. Stop layering, soften or redo the affected patch, and use a clean tool with a thin layer.
Should I use cream or powder blush as a beginner?
Choose for your base and skin: cream is easy to tap onto dry cheeks before powder; powder is easy to build with a fluffy brush over a lightly set base. Start with a sheer formula and a small amount rather than buying both.
Where do I put blush for a lifted look?
Start on the upper, outer cheekbone and blend up and back toward the temple. Keep the lower edge soft and check the placement with your face relaxed. Use a thin layer so the result is a gentle sweep rather than a stripe.
Looks to try
 Before
 After
Soft Glam
Beginner to intermediate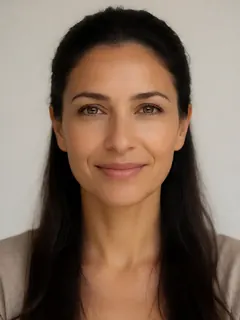 Before
 After
Bronze Goddess
Beginner to intermediate Before
 After
Eyeliner Focused
Intermediate
All faces shown are AI-generated fictional models, not real people.